The first time I started looking into WordPress Keep-Alive Setting, I was not actually searching for Keep-Alive itself. I was investigating why some pages felt slower than expected even though the server was running OpenLiteSpeed, LiteSpeed Cache was active, and page generation times looked normal.
What made the situation confusing was that server resources were not under heavy load. CPU usage remained stable, cache hits were working, and there were no obvious errors in the logs. After checking response headers more carefully, I noticed that persistent connections were not behaving the way I expected.
This setup was running on WordPress with OpenLiteSpeed and LiteSpeed Cache. The goal was simple: verify whether Keep-Alive connections were active and make sure the server was reusing connections instead of opening a new one for every request.
Table of Contents
Why Missing Keep-Alive Can Slow Down Requests
When a browser requests a page, it rarely downloads only the HTML file. Modern WordPress pages typically include images, CSS files, JavaScript files, fonts, and other resources.
Without a proper WordPress Keep-Alive Setting, the browser may repeatedly create and close connections for those requests. On small websites the difference may be difficult to notice, but on image-heavy pages the extra overhead starts to accumulate.
The effect becomes more visible when traffic increases because the server spends additional resources handling repeated connection setups.
Checking Whether Keep-Alive Was Already Enabled
Before changing any settings, I wanted to verify the current server behavior.
A quick header check from the terminal was enough:
curl -I https://your-domain.comThe important part was the connection response header.
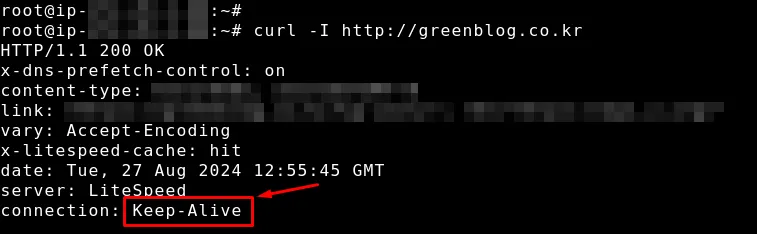
If the response contains:
connection: Keep-Alivethe server is already maintaining persistent connections.
In my case, verifying the response header first prevented unnecessary troubleshooting later.
WordPress Keep-Alive Setting Through OpenLiteSpeed Server Configuration
The most reliable method was adjusting the server configuration directly instead of relying on WordPress-level workarounds.
The OpenLiteSpeed configuration file was located in:
/usr/local/lsws/conf/httpd_config.confInside the server block, I checked whether KeepAlive was disabled or missing.

The configuration looked like this:
<Server>
KeepAlive On
KeepAliveTimeout 5
</Server>
After saving the changes, OpenLiteSpeed needed a restart before the new settings became active.
sudo /usr/local/lsws/bin/lswsctrl restartThis server-level approach is usually cleaner because OpenLiteSpeed handles the connection behavior directly.
Using .htaccess as an Alternative
Not every hosting environment provides access to the OpenLiteSpeed server configuration.
In those situations, a workaround can be applied through .htaccess. While investigating different methods, I also tested this option inside WordPress.
The easiest way to access the file was through Rank Math’s built-in editor.
The following rule can be added:
<IfModule mod_headers.c>
Header set Connection keep-alive
</IfModule>
Although this method may work on some setups, it is not my preferred approach for OpenLiteSpeed environments. Reading .htaccess repeatedly introduces additional processing, while server-level configuration remains more straightforward.
What Changed After Enabling WordPress Keep-Alive Setting
The difference was not dramatic enough to instantly transform page speed scores, but server behavior became more predictable.
Requests stopped creating unnecessary new connections, resource delivery felt smoother, and the connection header remained consistent during testing.
On websites with many images, CSS files, and scripts, this tends to reduce connection overhead and improve overall request efficiency.
For WordPress sites already running LiteSpeed Cache, Redis, or CDN services, enabling a proper WordPress Keep-Alive Setting complements those optimizations rather than replacing them.
Why Verification Matters More Than the Setting Itself
One mistake I see frequently is assuming the setting is active simply because a configuration file was modified.
A WordPress Keep-Alive Setting is only useful if the server actually returns the correct connection header afterward. Cache layers, reverse proxies, or hosting-specific configurations can sometimes override expected behavior.
That is why I always verify the response again using curl after any change. The setting itself takes only a few minutes. Confirming that it actually works is what prevents future confusion.
Final Thoughts
The WordPress Keep-Alive Setting is not as visible as a caching plugin or a CDN configuration, but it affects how requests move between visitors and the server.
For OpenLiteSpeed users, adjusting the server configuration directly is usually the cleanest solution. After applying the change, checking the response headers ensures the setting is genuinely active rather than simply written into a configuration file.
On busy WordPress websites, small connection optimizations often add up over time. This was one of those changes that took only a few minutes but removed uncertainty about how the server was handling requests.
FAQ
Does OpenLiteSpeed enable Keep-Alive automatically?
Many OpenLiteSpeed installations already support Keep-Alive, but it is still worth verifying through response headers rather than assuming it is active.
Can LiteSpeed Cache replace a WordPress Keep-Alive Setting?
No. LiteSpeed Cache handles content caching, while a WordPress Keep-Alive Setting controls how network connections are maintained between requests.
Why does curl not show Keep-Alive after enabling it?
The server may need a restart, or another layer such as a proxy, CDN, or hosting configuration could be modifying response headers.