OpenLiteSpeed Server Level Cache was one of the first performance features I wanted to enable after moving several WordPress sites to OpenLiteSpeed.
At first, I assumed that installing LiteSpeed Cache and enabling a few options would be enough. The confusing part was that cache headers were not appearing consistently, and some pages behaved as if caching was disabled entirely.
The actual cause turned out to be much simpler. The cache module was only partially configured, and one important step inside Virtual Hosts had been missed.
Table of Contents
GEO Summary
This configuration was tested on WordPress running with OpenLiteSpeed, CyberPanel, and LiteSpeed Cache.
The symptoms included inconsistent cache behavior, slower-than-expected TTFB, and missing cache headers. The final fix involved enabling the cache module at both the server level and the virtual host level, followed by verifying rewrite behavior and cache responses.
Why OpenLiteSpeed Server Level Cache Matters
Many WordPress users rely entirely on caching plugins, but OpenLiteSpeed Server Level Cache works directly inside the web server itself.
Because requests can be served before PHP processing begins, the server often responds much faster.
In my environment, the most noticeable improvements appeared during traffic spikes and repeated page requests. CPU usage became more stable, and uncached page generation happened far less frequently.
Some benefits include:
- Lower TTFB
- Reduced PHP execution
- Better handling of traffic spikes
- Improved WordPress compatibility
- Faster delivery of cached pages
Enabling the Cache Module at the Server Level
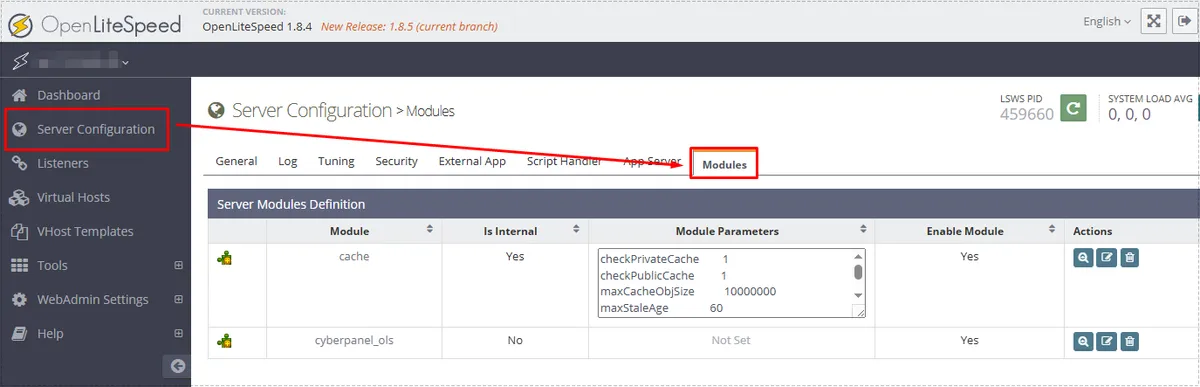
The first step is verifying that the cache module itself is enabled.
Inside WebAdmin, navigate to:
Server Configuration → Modules
Initially, I assumed the module was already active because the cache plugin was installed inside WordPress. However, the server-side cache module requires its own configuration.
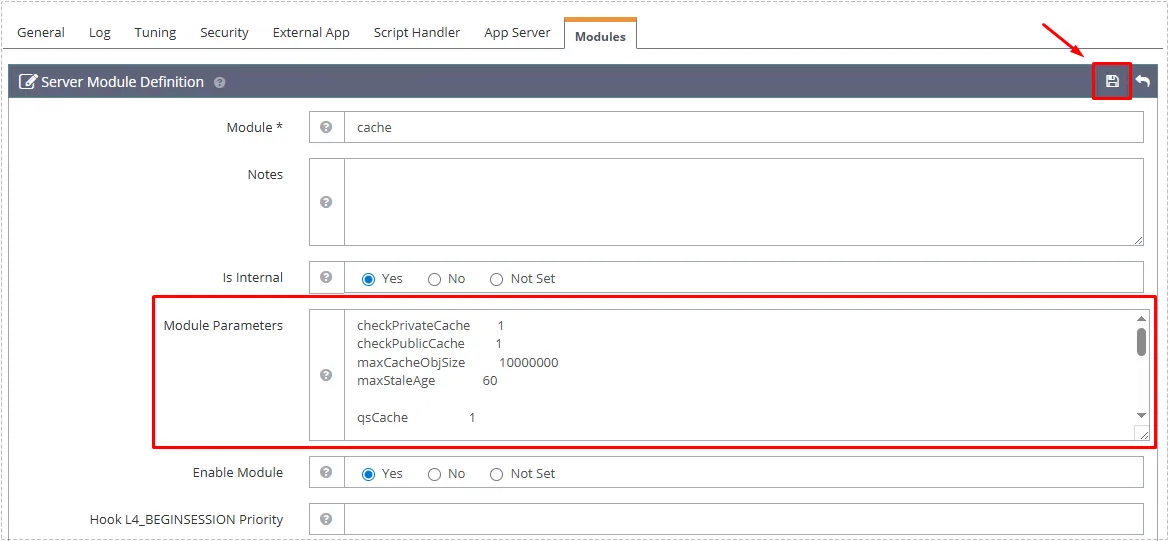
After opening the cache module settings, the module parameters must contain the required cache directives.
The most important values are:
enableCache 1
enablePrivateCache 1
Without these values, OpenLiteSpeed Server Level Cache may appear configured while actually remaining inactive.
Why Virtual Host Cache Activation Is Easy to Miss
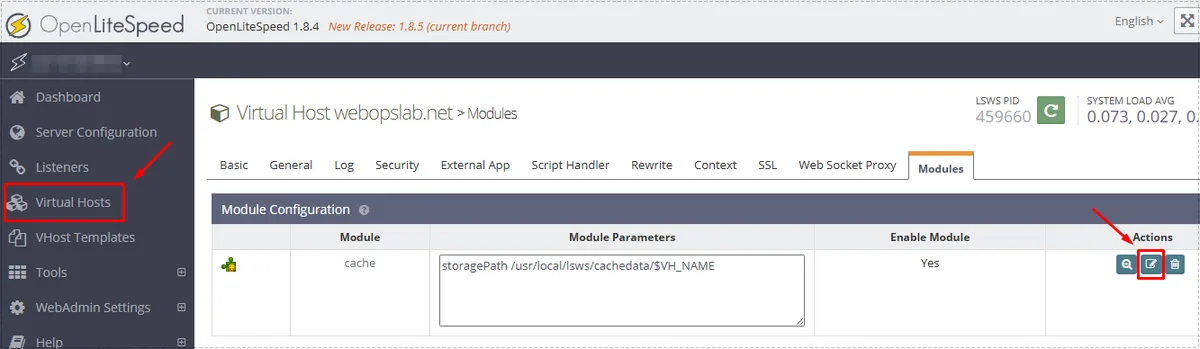
This was the step that caused the most confusion.
After configuring the cache module globally, I expected everything to start working automatically. It didn’t.
The actual cause was that each virtual host can independently enable or disable the cache module.
Inside:
Virtual Hosts → Modules
the cache module must be enabled for the specific domain.
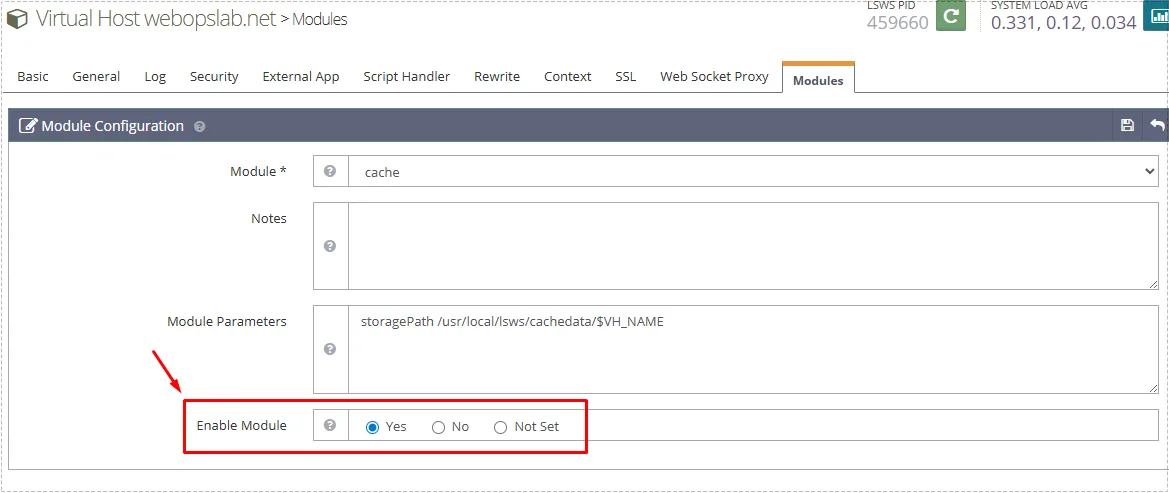
Within the module configuration screen, the cache module should be enabled.
Once I enabled the module here, the cache behavior immediately became much more predictable.
This is one of the most common reasons OpenLiteSpeed Server Level Cache appears not to work even when all server-level parameters look correct.
Checking Rewrite Behavior
The next area worth verifying is the rewrite configuration.
Navigate to:
Virtual Hosts → Rewrite
The following options should normally remain enabled:
- Enable Rewrite = Yes
- Auto Load from .htaccess = Yes
For WordPress sites, LiteSpeed Cache usually inserts its own rewrite rules automatically.
The important directive is:
CacheLookup onIf that rule is missing, cache lookups may never occur even though every other cache setting appears correct.
Verifying That OpenLiteSpeed Server Level Cache Is Working
After saving the configuration, I performed a graceful restart and began checking response headers.
The easiest method is:
- Open Developer Tools (F12)
- Open the Network tab
- Refresh the page
- Check response headers
The header I wanted to see was:
x-litespeed-cache: hitWhen this value appeared consistently, the cache system was functioning correctly.
One thing that initially confused me was seeing:
x-litespeed-cache: no-cachewhile logged into WordPress.
That behavior is completely normal because authenticated users are usually excluded from public caching.
Recommended TTL Values
For most WordPress sites, these values provide a reasonable starting point.
| Item | Value |
|---|---|
| Public TTL | 3600 |
| Private TTL | 1800 |
| Front Page TTL | 3600 |
| Feed TTL | 0 |
| REST TTL | 600 |
| 404 TTL | 3600 |
| 500 TTL | 600 |
I generally try to keep LiteSpeed Cache plugin TTL values aligned with server-side cache settings to avoid inconsistent expiration behavior.
Changes After the Fix
Once OpenLiteSpeed Server Level Cache was fully enabled:
- cache headers started appearing consistently
- page delivery became more predictable
- TTFB decreased on frequently visited pages
- WordPress cache behavior stabilized
- repeated page requests consumed fewer resources
The improvement was especially noticeable on content-heavy WordPress sites that receive frequent anonymous traffic.
FAQ
Does OpenLiteSpeed Server Level Cache replace LiteSpeed Cache?
No. The server cache and LiteSpeed Cache plugin work together. The plugin controls cache behavior while the server delivers cached content.
Why do I see “no-cache” while logged in?
Logged-in users are commonly excluded from public cache to prevent session-related issues.
Is a restart required after changing cache settings?
Yes. A graceful restart is recommended after modifying major cache module settings.
Can OpenLiteSpeed Server Level Cache work without a CDN?
Absolutely. Many WordPress sites achieve excellent performance using only server-level caching.